In the age of smartphones, our iPhones have become more than just communication devices. They are now powerful tools for creativity, education, and productivity. One feature that stands out, especially when it comes to these purposes, is screen recording. Whether you want to create a tutorial, capture a gaming session, or save a memorable moment, knowing how to screen record on your iPhone is a valuable skill. In this comprehensive guide, we will walk you through the entire process step by step, ensuring that you can effortlessly capture your iPhone screen.
Screen recording on an iPhone is an incredibly useful feature, but it's not always obvious how to get started. Fortunately, it's a straightforward process that we'll demystify in this article. By the time you finish reading, you'll be equipped to screen record on your iPhone with confidence.
Table of Contents
Step 1: Enable Screen Recording
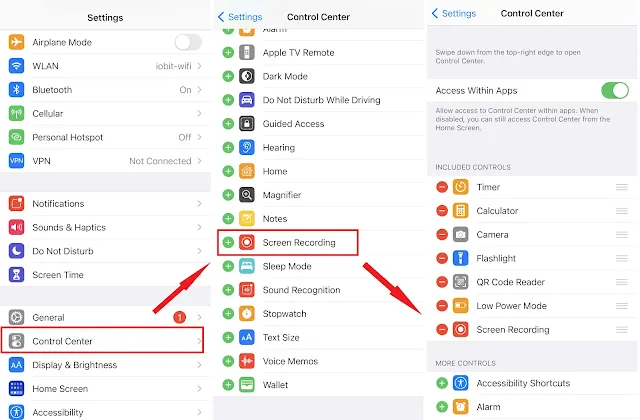
The first step in recording your iPhone screen is to enable the Screen Recording feature. Here's how:
- Open the Settings app on your iPhone.
- Scroll down and select Control Center.
- Tap on Customize Controls.
- In the "MORE CONTROLS" section, find Screen Recording, represented by a circular icon with a white dot inside, and tap the green "+" button next to it. This action will add Screen Recording to your Control Center.
Step 2: Start Recording
Now that you've added Screen Recording to your Control Center, it's time to start your recording. Follow these simple steps:
- To access the Control Center, swipe down from the upper-right corner of your screen (if you have an iPhone X or later) or swipe up from the bottom of the screen (if you have an iPhone 8 or earlier).
- In the Control Center, you'll see a Screen Recording icon, which looks like a white circle inside a red square. Tap this icon.
Step 3: Customize Your Recording (Optional)
Before you begin recording, you can customize your settings to include audio commentary using your device's microphone. Here's how:
- In the Control Center, press and hold the Screen Recording button. This will open the Screen Recording control panel.
- To enable or disable the microphone, tap the microphone icon. If it's white, it means the microphone is on, and you'll capture any sounds around you. If it's gray, the microphone is off, and only your device's audio will be recorded.
Step 4: Begin Recording
Now that your settings are configured, you're ready to start recording your iPhone screen. Follow these steps:
- Tap the Start Recording button.
- A three-second countdown will appear, allowing you to prepare.
- After the countdown, your iPhone screen recording will commence.
Step 5: Stop Recording
When you're ready to finish your recording, it's easy to stop. Here's how:
- To stop recording, tap the red status bar at the top of your screen. This bar shows the elapsed time of your recording.
- A confirmation pop-up will appear, asking if you want to stop the recording. Tap Stop to save your screen recording.
View and Share Your Screen Recording
After you've successfully stopped the recording, you can access it in the Photos app. It will be saved in the "Videos" album.
From there, you can easily view your recording, edit it, or share it with friends, colleagues, or your online audience.
Screen recording on your iPhone is a versatile feature that opens up a world of possibilities. Whether you're an educator looking to create instructional videos, a gamer sharing your epic wins, or simply someone who wants to document precious moments, knowing how to screen record on your iPhone is a skill that's worth mastering.
By following the steps outlined in this article, you can effortlessly capture your iPhone screen and share your recordings with ease. It's a valuable tool for enhancing your iPhone experience and unlocking new ways to use your device.
In conclusion, screen recording on your iPhone is a feature that can be both fun and practical. It's a great way to share your experiences, document your achievements, and create educational content. With the step-by-step guide provided in this article, you can master the art of screen recording on your iPhone and take full advantage of this powerful feature. Whether you're a tech enthusiast or a casual iPhone user, the ability to record your screen can come in handy in various situations. So, follow the instructions and start capturing your iPhone screen today!


0 Comments